Active Sword Tutorial (Maya 5.0)
This is a legacy tutorial extracted from the Internet Archive. Due to the conversion process, some alterations have occurred.
This tutorial or recipe is about how to make a sword that causes multiple victims to bleed anytime it strikes them. The logic is to make the sword have particles that can collide with the victims and have a particle collision event cause the bleeding.
You ready? Then, let’s go!
Step 1: Set it Up
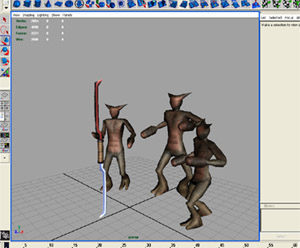
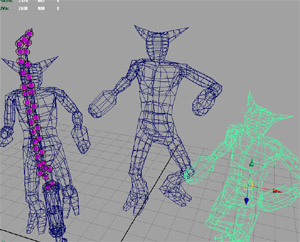
Assemble your props and actors. You can make simple dummy objects if you wish. I put in my Taolance and three Craper victims.
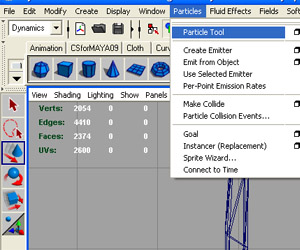
Step 2: Add Particles
Switch to an orthographic view (top, side or front depending on your model) such that you can see both edges of your blade.
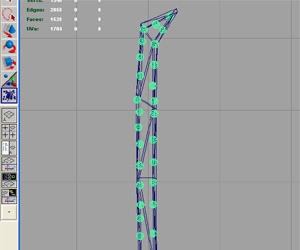
Now select the Particle Tool by going to Particles → Particle Tool and outline the blade with particles. More particles means that the object will bleed more.
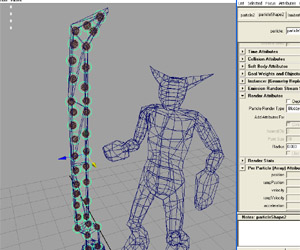
For visibility and clarity, change render attributes of the particles. Do this by selecting the particle and going to the Attribute Editor, go to the particleShape node, look for Render Attributes (normally above Render Stats) and change the Particle Render Type.
I set mine to Spheres. Click Add Attributes For “Current Render Type” and adjust the settings to what you want.
Step 3: Duplicate Particles
At this point, duplicate the particles. Move them a little and change their Particle Render Type so you can differentiate between the two sets of particles. I set them to Blobby Surfaces.
Step 4: Make Goals
Select the first set of particles and then the second. Make the second the goal of the first by going to Particles → Goal.
If you play it, the first set of particles will move to the second.
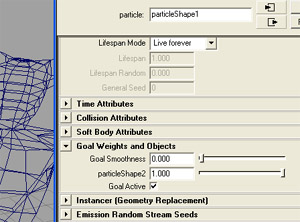
Fix the wobbling by going to the particleShape node of the first set of particles. Under Goal Weights and Objects, set Goal Smoothness to 0 and set particleShape2 to 1.
Now the first set snaps to the second.
Why we do this, you shall find out shortly.
Step 5: Make Victims Collidable
Now select the first set of particles (called particle1 from now on) and one victim and go to Particles → Make Collide.
Repeat for the rest and make sure that all victims have GeoConnectors attached.
Set Resilience and Friction of these to 0.
Now particle1 can collide with the victims.
Step 6: Test It
Parent the second set of particles (particle2) to the sword. Animate the sword slicing through the victims.
As particle2 moves through the victims, particle1 collides with them and then tries to return to its goal of particle2.
What this means:
- particle1 causes the collision and triggers bleeding
- particle2 returns particle1 to the sword
- this lets particle1 collide with the next victim
- otherwise it would fly off and the sword would stop reacting
If particles get stuck, the GeoConnector friction is too high. Set it to zero.
Step 7: Make Them Bleed
Click particle1 and go to:
Particles → Particle Collision Events
Select particle1.
Ensure:
- All Collisions is checked
- Event Type = Emit
- Num Particles = 9
- Original Particle Dies is unchecked
Click Create Event.
A new particle object appears. This is particle3. This is the blood.
Play it and you should see particle3 explode from the object when hit.
Step 8: Set Up Blood
Select particle3.
Change:
- Render Type to Streaks (or whatever you want)
- Assign a shader of your choice
Apply gravity to particle3 using:
Fields → Gravity
You can return to Particle Collision Events to change values.
Tweak stuff.
It does not have to be over.
Take things to the next level.
Under particle collision events, you can attach a MEL Script to the Event Procedure.
global proc myEventProc(string $particleName, int $particleId, string $objectName) {
    select $objectName; // choose the object that has been hit
    surfaceShatter("surfaceShatter", 5, 1, 1, 1, 0, 0, 0, 1, "rigid bodies with collisions off", 0, 1);
}
This simple code will shatter the object when it is hit. You can use this to make bullets break glass.
You can also apply various events and attributes to the blood itself. You can instance objects to particles and make them collide with other objects.
Drawbacks
Since a lot depends on how fast particle1 snaps back to particle2, if the sword moves too fast, collisions may be delayed or missed.
Also, during collision aftermath, particle1 may hit other nearby victims and trigger more bleed events, which can look strange.
Side Notes
Only three render attributes can render in software:
- Blobbies
- Cloud
- Tube
Spheres and points will not render in software but are meant for hardware render.
Hope you enjoyed this tutorial.