Character Export to Director (Maya 5.0)
This is a legacy tutorial extracted from the Internet Archive. Due to the conversion process, some alterations have occurred.
This tutorial or lecture is about how to export an animated character from Maya into Director. The process for 3DS Max is already well-documented and a bit easier too. Click the Discreet link in the original article for a good Max tutorial.
But there is hardly any information for exporting Maya characters, so I decided to come up with this. Have fun.
Step 1: Get your Character Ready
Model, texture, rig, animate, etc. Get your character ready to go. But here are some things to take into account.
- The character needs to be made of polygons
- Make sure it is clean and optimized
- Procedural textures get crunched into one flat texture
- Keep shader networks simple
- Prefer Lamberts or Blinns
- Make sure you smooth bind
- If you used rigid bind, detach and rebind
- Do not use deformers
- Name all your bones
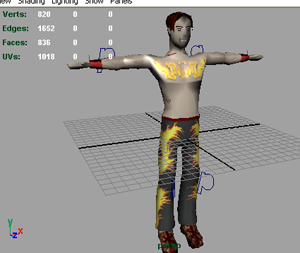
For this tutorial, I whipped out Mr. Fire Eater, did a quick rig, and laid a few keyframes here and there. There are two animations:
- Dawdle Cycle: Frames 0 – 20
- “Yo! Sup!”: Frames 22 – 33
Whatever. :P
Step 2: S3D Export
Go to:
Window → Settings/Preferences → Plug-in Manager
Look for MayaShockwave3DExport and load it.
This comes with Maya 5.0, but plugins for 4.0 and 4.5 are available on the Alias Downloads page.
You should now see Shockwave 3D Exporter in the menu bar.

Now is a good time to light the scene. Place a few point lights.
Then go to:
Shockwave 3D Exporter → Export Express — All
Review the options. Check the documentation if needed.
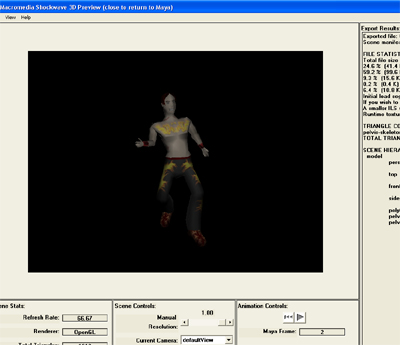
If export succeeds, you will see the 3D Preview. This shows how the character will look inside Director. Look through it and check the stats.
Step 3: It is Time for Director
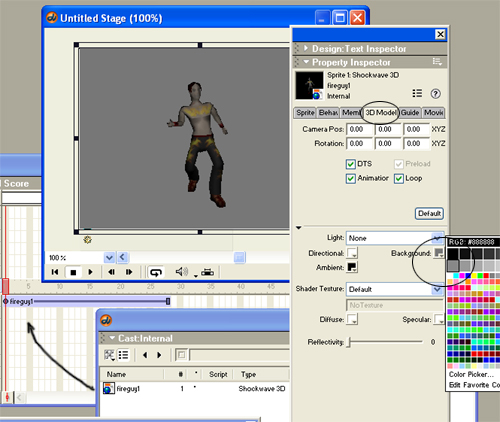
You should now have a W3D file. Import it into your Director cast.
Drag the cast member to the score and you should see your character on stage.
I suggest brightening the background color:
- Click the 3D sprite
- Open Property Inspector
- Go to 3D Model
- Change Background Color
Play the movie. The character should cycle through all animation.
However, sometimes you want better control. Time to meet the Bonesplayer.
Step 4: Script the Bones
The Bonesplayer modifier manages character motion. Once a model has a Bonesplayer, you can control:
- speed
- playback
- pausing
- sequencing
In 3DS Max, the model and rig are grouped and that group becomes the Bonesplayer model.
In Maya, the root of the skeleton is normally the Bonesplayer model.
In my case:
- Root bone = pelvis
- Bonesplayer model = pelvis-skeleton
To confirm:
- Open Object Inspector
- Drag the 3D cast member into it
- Expand Models
- Look for the skeleton root
- Expand it
- You will see the Bonesplayer and its properties

Now it is time for scripting.
Press Control + 0 to open Script Window.
Create a Behavior Script and attach it to the 3D sprite.
Add this:
on beginsprite me
  member(1).model("pelvis-skeleton").bonesplayer.pause()
end
This means when the sprite starts, the Bonesplayer pauses. The character should now be still.
Now to explain the play command:
bonesPlayer.play("animation name", Looped, StartTime, EndTime, PlayRate)
Important notes:
- Animation name comes from Object Inspector
- Loop = 1 for looping, 0 for no looping
- Time is in milliseconds
- Convert frames → seconds → milliseconds
- PlayRate controls speed
Now we will use it in a case statement:
on keydown me
  case the keycode of
    123: member(1).model("pelvis-skeleton").bonesplayer.play("pelvis-skeleton-motion0", 1, 0, 666, 1)
  end case
end
This listens for keys. Keycode 123 = Left Arrow. Pressing left plays the Dawdle cycle.
Now repeat for the second animation:
on keydown me
  case the keycode of
    123: member(1).model("pelvis-skeleton").bonesplayer.play("pelvis-skeleton-motion0", 1, 0, 666, 1)
    124: member(1).model("pelvis-skeleton").bonesplayer.play("pelvis-skeleton-motion0", 0, 733, 1100, 1)
  end case
end
Keycode 124 = Right Arrow
Left = Dawdle
Right = “Yo! Sup!”
Take Things to the Next Level
This is only the beginning. With Bonesplayer you can:
- queue actions
- blend animations
- use external animation playlists