Wings 3D + CharacterFX
Wings 3D -> CharacterFX Workflow (Aug 2004)
This is a legacy tutorial extracted from the Internet Archive. Due to the conversion process, some alterations have occurred.
This tutorial aims to demonstrate how to get a character model out of Wings 3D and into CharacterFX to create animations for a game. I’m using CharacterFX 1.3.4, which is pretty unique in that it’s a good animation tool for games that’s extremely affordable. I hope to write some scripting tutorials for CFX in the future.
Step 1: Exporting/Importing the Mesh
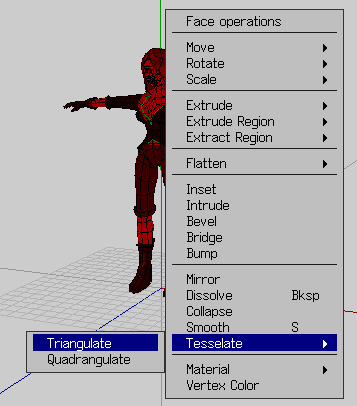
Open your Wings 3D character. Select all faces and Right-click > Tesselate > Triangulate the mesh. Clean it up. The format that CFX has least issues with is 3DS. So export to 3DS from Wings 3D.
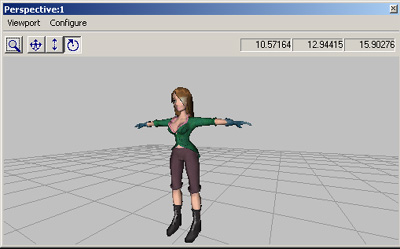
Open CFX. File > Import … your 3DS file. Should all go well, CFX will import the data from the 3DS. It may take a while to process it (esp for high-poly meshes) and you may see a loading bar. Patience is good!
Step 2: CharacterFX Orientation
Let’s brush thru some CFX basics. There are two levels or modes in CFX: Object and Animation.
- Object level is where you position your mesh, set up a skeleton and assign vertices. Note that, even after you have bound your model, your skeleton doesn’t drive your mesh in the Object level (only in Animation).
- Animation level is where you can manipulate the bones to move the character. You can set/edit keyframes or use the nifty IK tool.
You can add New Viewports from the Windows menu. Arranging them will let you choose how to position the viewports. You can navigate the viewport with the middle-mouse button: press to pan and mouse-scroll to zoom. The Configure menu in each Viewport toolbar lets you choose the camera angle, drawing style and grid visibility.
Right-clicking a tool button brings up its Options box. This comes in handy many times. Oh! And to delete an object, press Ctrl+Del.
Step 3: Bone-building
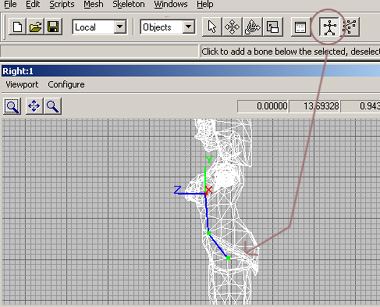
Go to Object level, Click the Create Joints button and create your character’s spinal column by clicking from the hips area to the neck/head. The spots where you place your joints are really important. I’d suggest reading some docs on rigging.
To create extremities like arms and legs, click on the Select tool and select the joint from where you want the extremity to originate; then click the Create Joints button and start clicking to add and connect the joints. Your bones may not always be added at where you click; don’t worry! Just move them later with the Translate tool. I recommend not rotating your bones.
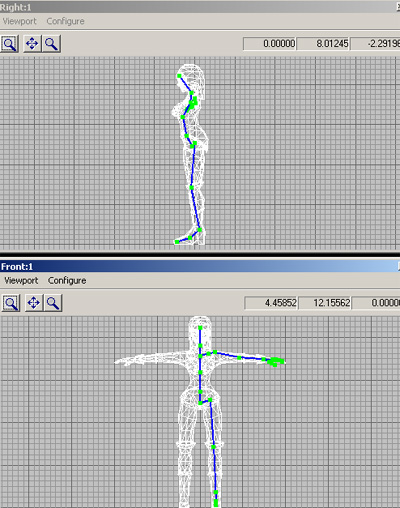
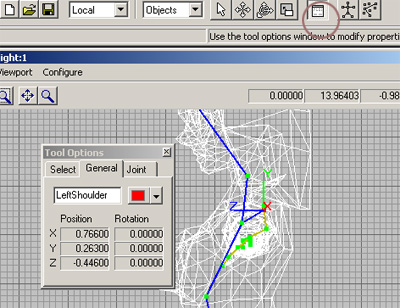
Time for some grunt work: naming your bones and assigning them colors. To do this, Right-click the Edit Object Properties button, select the joints and alter the fields in the Option box. This may seem like an unnecessary step but in the long run, it pays off. At this point, it may be a good idea to turn off mesh selection. Do this by going to the Select tab and unchecking Mesh.
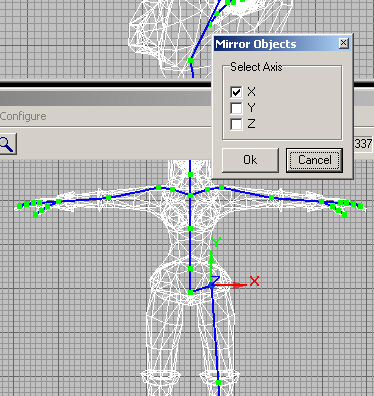
Now you are ready to duplicate and mirror the arms and legs. Select the first bone in the chain, do Edit > Duplicate Objects. Select the duplicated set, identifiable by a suffix of Copy, and execute Edit > Mirror Objects. It will ask for an axis to flip the object over. Select the appropriate axis. You may notice it doesn’t flip about the midline of the character but about itself. You will need to translate the new set of bones to its correct position (negative of the original bone’s flipped axis value) by cringe eyeballing it. Then go ahead and rename the duplicated joints. Caution! There’s a slight penalty for duplicating your bones this way. Your IK gets messed up. This can be fixed by doing an Auto Orient Joint on all the bones. If you don’t like the idea of flipping bones, you can skip this technique and simply recreate the bones for the other side.
Skinning! Up Next!
Step 4: Binding/Skinning
Psionic has written some good tutorials on this step. This step involves a fair amount of focus. First, select the root of the skeleton and the mesh and go to Skeleton > Bind Skin. A dialogue should pop up; set the values specific to your model and click OK.
There are two skin types: rigid and deformable. Rigid means that only one bone affects one vertex; deformable means that 2-4 bones can affect one vertex. Think of deformable like human skin. Just to make our lives hell, I’ll choose deformable skin type.
To test it, switch to Animation level and rotate a joint or pull one with the IK tool. If it works, chances are things won’t bend the way they should; you will need to go and edit some of the vertex weights.
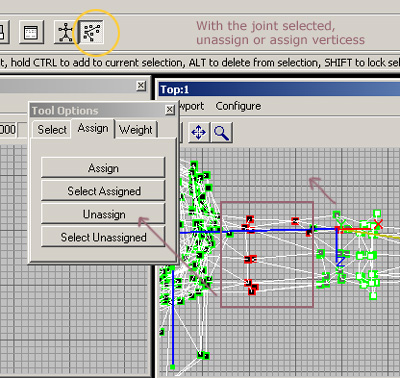
Right-click the Edit Vertex Assignments button and repeat these steps:
- Select the joint.
- Click “Select Assigned” in the Edit Vertex option box. 3a. Select only the vertices to be assigned and with the joint still selected, click Assign. 3b. Select only the vertices to be removed and with the joint still selected, click Unassign.
- Select the next joint.
During this process, be careful not to deselect the joint or select another.
Another thing to keep in the back of your head is that the sum of joint influences on a vertex should be 1.
Also, if you want a joint to have full influence over a vertex, be sure that the color of the vertex, when the joint is selected, is white. White means total influence; black means none. Also, be sure to unassign vertices from other joints; these minor scattered influences mean that your joint won’t have total influence. A lot of patience and practice is required!
Step 5: Other Rigging features
IK is Inverse Kinematics. If you go to the Animate level, you’ll see a hierarchy of bones. If you move the shoulder, its children (arm, hand, fingers) will move with it. This is Forward Kinematics, where the top dog leads the little pups. Inverse Kinematics is the opposite. Here, moving the wrist will pull the elbow, will pull the shoulder, etc.
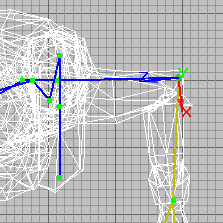
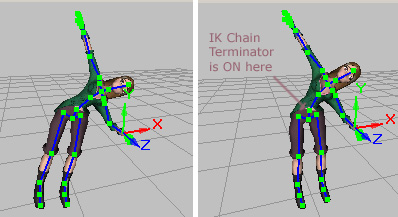
Using IK in CFX is pretty straight forward. Just click the IK button and pull the joints. You may notice though that pulling the wrist, will affect all the joints right down to the root, causing the legs to flail. We may not want this; our solution is the IK Chain Terminator. Here we select a joint where we want the pulling to stop. I usually select the joint right before the root; you may select the shoulder joint as an alternative. Switch to Object level and right-click Edit Object Properties and go to the Joint. Select your joint and check the IK Chain Terminator box. Go to Animation level and test it.
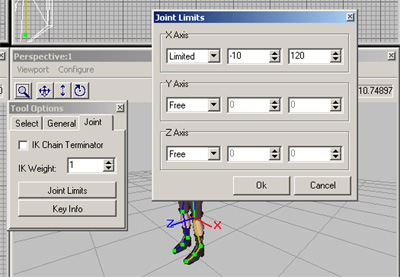
Another feature you should take note of is Joint Limits. This is sort of a helper for IK. With it, you can lock or restrict bone movement. For example, a healthy human being’s lower leg doesn’t bend beyond a certain point. With Joint Limits, you can set such a behavior up. Go back to the Joint tab, and click the Joint Limits button. Choose the desired axis and set it to free, locked or limited. Put in your values. Click OK. Test it with the IK tool.
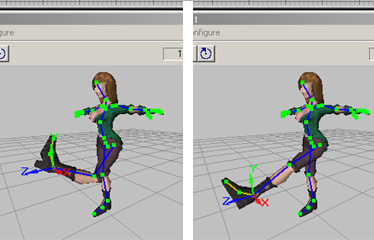
Step 6: Animate and Export The Animation tool in CFX is pretty standard. Select your frame in the timeline, position your bones, set key. If you have Auto Keyframe turned on, every movement is keyed. Set up a bunch of keyframes and CFX tweens them and this interpolation leads to your animation.
Under the Animation menu is a Rest Pose command; this reverts your model to its original T-stance pose. I’m not sure how reliable it is. Referring to a previous step, if you duplicated and mirrored your bones, now would be a good time to do an Auto-Orient joint on all the joints. You may have to go back and reset the Joint Limits. In my case, I just had to multiply the values by -1.
From here, you can export to your favorite game format. I exported to MD2 and put it in Npherno’s compiler. Download screencaps of the animation here.
Anything to say? Send me your thoughts! Thanks!