Wings 3D + MotionBuilder
Wings 3D -> MotionBuilder Workflow (Aug 2004)
This is a legacy tutorial extracted from the Internet Archive. Due to the conversion process, some alterations have occurred.
The purpose of this tutorial is to show how to integrate Wings 3D and MotionBuilder to create animated game characters. We’ll export a modeled/textured character out of Wings 3D into MotionBuilder 5.5 Standard, where we’ll set it up and animate it. Just a word of caution … integrating Wings 3D and MotionBuilder in the way described involves a bit of effort since we’ll be doing things MotionBuilder wasn’t intended to do. Save often.
Let’s Wing it and get into Motion!
Step 1: Intro to the Workflow
First things first, some of my findings/opinions: Without expensive software like Maya, Max, XSi, Cinsema4D and LightWave, MotionBuilder is a pretty dead-end program for creating animated characters for a 3D game. What I mean is, once it goes in – it doesn’t come out. Truly, MotionBuilder was designed as a companion program and not a substitute. In fact, I’m not even sure if MotionBuilder was designed for game animation! But I do know it’s really good for character animation and that animation can be used in games.
Only two formats in MB get exported with animation, BVH and 3DS. But here’s the issue: if you import just a model with no skeletal/rig data, even if you set skeletons up and skin it with MB’s vertex skinning tool, the model exported will be static. What this means is, you cannot export skinned characters. HOWEVER, you can export segmented characters to the 3DS format. These work fine because they are dependant upon transform animation which gets exported nicely into the 3DS file format. More on this shortly.
Now if you wanted to use MotionBuilder for making sprites for a 2D game, you won’t have any export issues since you are rendering to 2D. So you can make skeletal animation and not have to worry about export issues. Just import your model, build the skeleton, skin the model, characterize it, animate the character and render. You can even make SWF files for Flash games!
Note: I am using MotionBuilder Standard which has fewer features than its $4000 “Professional” counterpart.
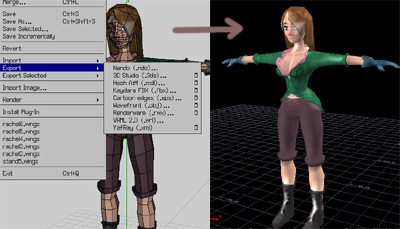
Step 2: Out of Wings
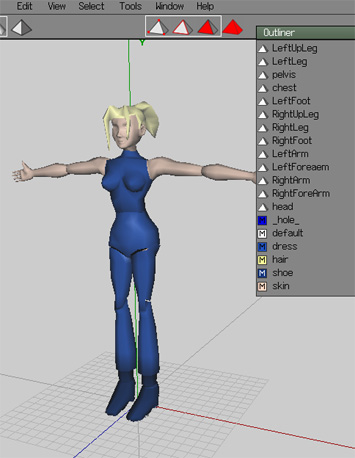
Clean up your model. Export it out of Wings 3D, by clicking File > Export and choosing either .3DS or .OBJ. If you have the FBX plugin installed, you can export to .FBX. Switch to MB and import the file you exported (if FBX, just simply open it).
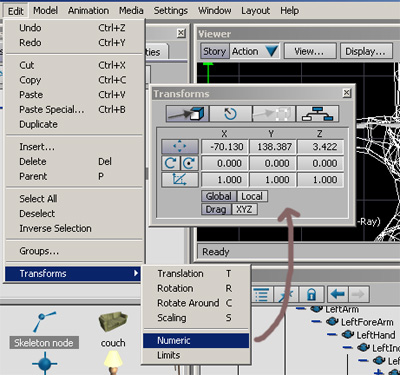
Step 3: Making Bones
Go to the Asset Browser > Templates > Elements > Skeleton Root and drag a node on screen. Position it where you want to. Now with the Root selected, double click the Skeleton Node and add the spinal bones. Work in X-ray mode so you can add bones within the model. When you are done, right-click to cancel. In the same way, select a spine joint, double click the Skeleton Node and add bones for the arms. Do the same for the legs and other parts of the body. I haven’t come across a Mirror Bones option in MB. So I usually recreate the bones or duplicate them. To make sure they line up properly, I compare the translate values via the Numeric dialog. This can be accessed from Edit > Transform > Numeric. This is a little grunt work. Standard users could use some of that there Python scripting.
Don’t rotate the bones! Don’t forget to name them. More grunt work. Naming them based on MB’s naming convention will ensure quick characterization. For this tutorial, I’m not making all the finger bones. That would be a lot more grunt work. All this grunt work foreshadows something even harder!!
Grunt! Skinning!! Up Next!
Step 4: Vertex Skinning
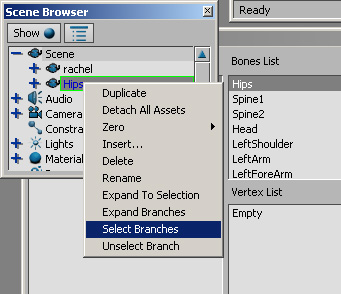
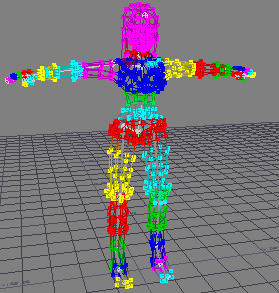
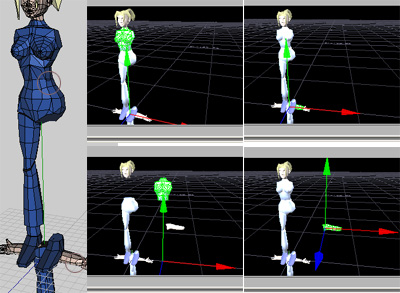
Fortunately, MotionBuilder has a slick Skinning system. It may take a few tries to get the hang of it, but once you develop a pattern, you’ll be running through it like a hot stone in a vat of butter! Click on Model > Skins and the Skins window should pop up. It would be a good idea to make a seperate layout for skinning. Switch to “Normal” display, Alt-drag and drop the model onto the Model List. Then click on the skeleton root, Select branches and drag and drop that on to the Bones List
This tells MB that whatever is in the Bones List affects that model. You are now ready to assign vertices to the Bones in the Bones List. It would be a good idea to change the camera background color to something other than black. Here are the steps to follow:
- Select the desired bone (from the Bones List or Viewport).
- Left-click to add vertices and Middle-click to remove.
- Shift the Weight Slider for that particular bone to assign the selected vertices.
- Double-click the viewport to deselect the bones/vertices.
- Repeat! Do this until no more vertices are black.
Step 5: Characterize
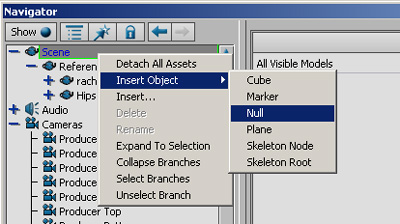
There that wasn’t so bad. The worst of it is over! Switch out of Skins mode. Create a Reference node if you haven’t already done so. Do this, by right-clicking the scene in the navigator, Insert Object > Null. Make it the parent of the model and the skeleton. Rename it to “Reference”
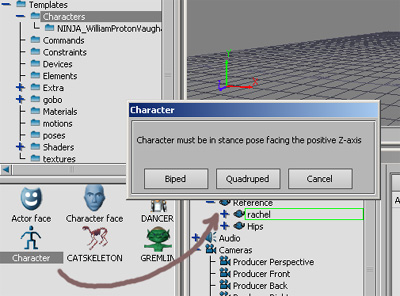
Characterize your character by dragging a Character element out of the Asset Browser > Templates > Characters and releasing it over your model. Select “Biped” and you’re done (provided the bone names match up).
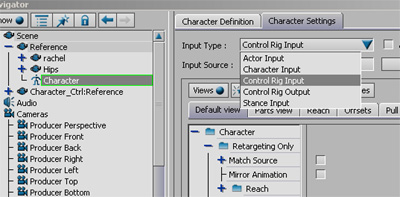
Go to the Character Settings and set the input type to “Control Rig Input”; set it to Active and your character rig should be ready! Go ahead and animate. You may also set your input type to “Character Input” to imitate another character.
When you are done animating, it’s time to render out the sprites!
Sprites are cool! Next!
Step 6: Rendering Sprites
This step is pretty straightforward. Set up your camera and render out the frames as TGAs. Batch convert to your image format of choice for use in a game engine. You may need to use a sprite editor to compile the sprites or something. If you want to use the SWF renderer, it’s best to have simple shaded characters. Download a compiled bitmap and a SWF sequence.
Extras: Exporting 3D
The tutorial should have ended at Step 6. But if you really want a 3D character instead of a 2D sprite in your game, then your last resort is the following. Break your model into pieces! Yep, go into Wings 3D and break your model up by Extracting the faces.
Take into account that the pivot points for the pieces in MB are (0, 0, 0) when you export as OBJ or 3DS. So no matter their position, in MB, they’ll be transformed about the center of the world. If you want to use those formats, you’ll need to move the pieces to the center of the world in Wings 3D itself. If you export as FBX, the pivot point is set to the center of the object. Don’t import an FBX; all models will be moved to the center of the world.
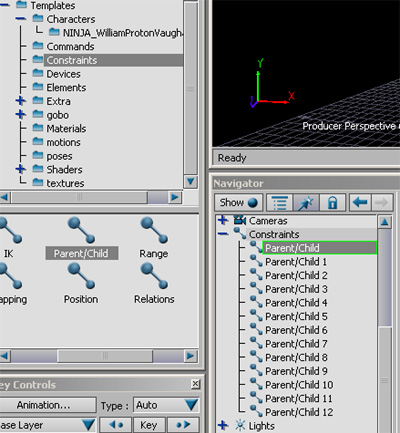
OK, so now you have a multiple-mesh character in MB. At this point, you can start animating your character. However, it would be a total waste not to use MB’s rigging capabilities. Thus said, go ahead and build or import a skeleton. The intention is to create a skeleton that will drive the mesh pieces and then to plot (transfer) the animation from skeleton to mesh and delete the skeleton. Once you have the skeleton in place, you’ll need to constrain each piece of the character to its corresponding joint with a Parent/Child constraint. From Asset Browser > Templates > Constraints, drag and drop Parent/Child constraints for each piece.
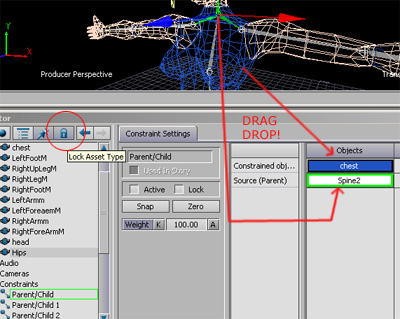
When you are done with that, lock the Navigator view and Alt-drag the mesh and then its corresponding bone to Constrained object slot and Source slot, respectively. Repeat till it’s all done! Set the constrains to “Active”. If your pivots match your joints, you are fine. Otherwise some shifting of the pieces is required.
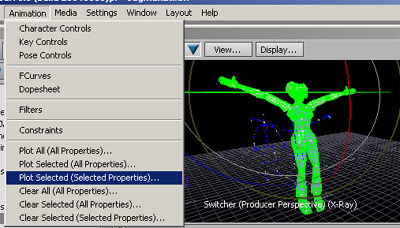
When everything is in place, create the reference node for the skeleton root and characterize it. Animate your character. When you are done with that phase, you are ready to plot the animation from the skeleton to the character. Do this by selecting the pieces, then Animation > Plot Selected (All Properties). You may notice a whole bunch of keyframes added to the pieces. Now you can do away with all the bones! Play your animation to view the transform animation on your character.
Export as a 3DS file! You’re good to go!
Special thanks to E-Z of the Kaydara forums for enlightening me about constraints.
Thank you for reading this tutorial. I hope it has helped you in some way. Please send some feedback.